
How to Fix a Hole in an Air Mattress? Step by Step Guide

Over time, all air mattresses lose part of their inflated. However, if your air mattress does not stay inflated or loses too much air, you most likely have a hole. Fortunately, air mattress repair is often a simple operation that can be accomplished using either a patch kit or a do-it-yourself approach.
To repair the leak, you must first find the hole and clean the surrounding area. Then, plug the leak using an adhesive and some plastic or vinyl patches. After allowing the patch to dry for several hours, examine it to ensure the mattress is no longer leaking.
We’ll go through the items and methods you’ll need to know to repair your leaking air mattress.
Table of Contents
How to Fix a Leaky Air Mattress: Step by Step
Materials and Equipment You Will Need:
- Cleanser for sensitive skin: Dish soap or detergent aids in cleaning the patched area and locating the leak.
- Sponge or Cleaning Towel: To clean the air mattress, dampen the sponge or towel. It is also useful in locating the hole.
- Tissue: Place a single tissue or paper towel on the mattress to detect losing air.
- Patch Kit from the Manufacturer: Many air mattresses have a patch kit. These kits typically include an adhesive, applicator, and patches that match the material of your air mattress.
- Other Patch Kit: If your air mattress did not come with a patch kit or you can’t find it, you may buy air mattress patch kits online or at local merchants. These kits include the same fundamental materials as the manufacturer’s kit. Consider purchasing a package that includes patches that match the material and color of your air mattress.
- Thin Plastic Material: If you are not utilizing a kit, you must make a patch out of thin plastic material. A shower curtain liner or other strong plastic will do.
- If you’re not using a patch kit, you’ll also need glue. Use a strong adhesive, preferably one designed for plastic or one that dries airtight.
- After placing the patch, place a flat, heavy item on the mattress to allow the patch to dry and attach. Consider using a book or a box with heavy goods.
Verify the leak
Before attempting to repair a leak, you must first determine that one is occurring. Air mattresses lose air naturally with time, which can be increased by temperature changes and other causes.
Before you start looking for the cause of the leak, make sure your air mattress is properly inflated. Then, lie on it for a few minutes to check whether it starts to deflate. If it loses a significant quantity of air, it most certainly has a hole or rip somewhere, which means it’s time to go to step two.
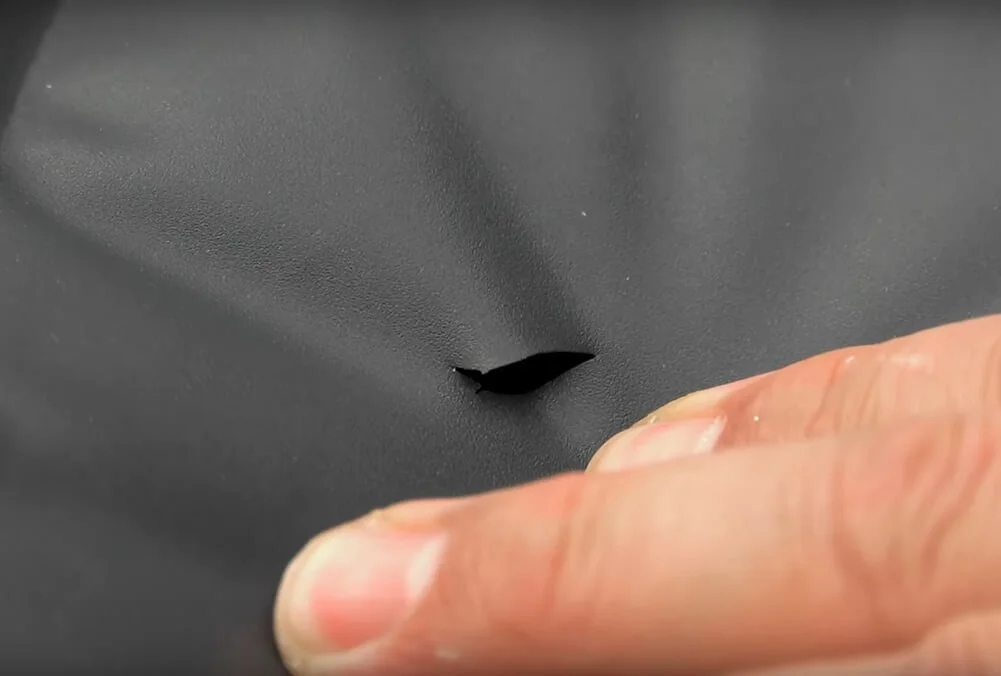
Find the source.
Leaks in air mattresses are typically caused by a small hole or tear in the vinyl. A broken gasket may also be the source of a leak in rare situations. In any case, the next step is to find the source.
Rips and rips are typically easy to spot. There are a few ways to use for smaller holes. To begin, completely inflate your mattress and position it upright against a wall, bottom facing you. Examine the surface carefully for any signs of damage. Check seams since minor fractures emerge commonly in these places. Gently squeeze the mattress to hear the sound of air escaping.
If you are unable to detect the leak in this manner, go to the kitchen. Apply dish soap to a clean kitchen sponge, massage it between your hands to make it sudsy, then squeeze out the majority of the water. Rub the sponge all over the surface of the air mattress, keeping an eye out for new bubbles. If a certain place creates greater bubbles, it is likely that the leak is originating from that location.
Clean and label the leaked area
Once you’ve identified the source of the leak, thoroughly clean the area. Allow it to dry entirely on its own. Make a gentle circle around the leak with a marker so you don’t lose track of it.
A smooth surface is ideal for getting a patch to attach correctly. If the surface of the air mattress is rough or ribbed, you may need to sand it down gently using fine or very-fine sandpaper.
Repair the leak
It’s time to fix the leak once the damaged area is clean and completely dry. Here are a few options, given in descending order of effectiveness:
- Using the air mattress repair kit that comes with it
- Using an online-purchased third-party air mattress repair kit
- Using a bicycle tire repair kit
- Making a patch out of a thin plastic material, such as a shower curtain
- Simply follow the manufacturer’s directions if you intend to use a patch kit. If you want to do it yourself, you may need to improvise a little depending on the amount and severity of the leak, as well as the material you choose for the patch.
In general, here’s how to apply a patch to a leaking air mattress:
- Deflate the air mattress completely and seal it shut.
- Ascertain that the leaked region is entirely clean and dry.
- Adjust the mattress so that the leaked region is flat and fully exposed.
- Apply the patch to the afflicted area, leaving at least a half-inch border around all sides of the leak.
- If you use a bandage-style patch, it should be sticky and applied directly over the leaking region.
- When utilizing a simpler patch, add a strong glue or adhesive to the patch’s perimeter before applying it.
- After applying the patch, lay a heavy, flat item over top to prevent the edges from curling up.
- Allow at least 8 hours for the patch to dry.
- Inflate the mattress carefully, checking for leaks.
You should be able to effectively patch your air mattress if you follow these procedures. Once mended, keep an eye on the patch to make sure it isn’t flaking off. If the patch seal weakens and leaks again, you may need to repeat the operation.
Seal of Approval
After the patch has been put and has had time to adhere, the seal must be tested. This will ensure that the leak has been corrected and that your air mattress will not deflate the next time you use it.
Inflate the mattress completely. Place it on the ground and press down on it to guide air to the spot. Feel for any leaking air or listen for it. Whether the seal appears to be tight, lay on the mattress for a few minutes to check if it starts to deflate. If the air mattress no longer appears to be leaking air, the hole has been repaired.
FAQ
How do you find a leak in an air mattress?
Applying a soapy sponge to the surface of a fully inflated mattress is the best approach to find a leak. Keep an eye out for any spots where bubbles form and expand, which might indicate a leak. You may also fully inflate the mattress and simply listen for the sound of releasing air.
For more detail, click How do you find a leak in an air mattress?
What is the best way to repair a leaking gasket or seal?
If the air mattress leak is caused by the gasket, the repair may be more complex. Check the owner’s handbook for the mattress, or find one online, first to see whether a remedy is described. In many circumstances, a leaking gasket must be entirely replaced.
How do you repair a leaking seam?
If your leak is coming from a seam, patching will usually not work. To seal the hole, you can use a hot glue gun or a high-strength adhesive. If the tear is significant, you might need to fold the surrounding cloth in on itself and glue the sides together. When using a hot glue gun, use extreme caution since the heat from the metal tip might melt the surface of the air mattress.
Conclusion
Finally, duct tape can be used as a temporary fix. Because the adhesive on the tape will ultimately wear out, use this procedure just until you can replace it with a more permanent repair; and make sure to clear out any residue from the tape before putting a patch.
Good luck, and rest well!


![Silk & Snow Hybrid Mattress Review Should You Buy It Or Not [2022]](https://www.myspacebeds.com/wp-content/uploads/2022/11/Silk-Snow-Hybrid-Mattress-Review-Should-You-Buy-It-Or-Not-2022-520x293.jpg)
![Therapedic Mattress Reviews Buy Or Avoid [2022]](https://www.myspacebeds.com/wp-content/uploads/2022/10/Therapedic-Mattress-Reviews-Buy-Or-Avoid-2022-520x293.jpeg)
